How to create ec2 instance on aws (amazon web service) ami ubuntu 18.04
Introduction:
Cloud is now a term that is familiar to every server administrator, developer and software engineer. It is a mind blowing concept. If you are a developer, you are busy with your coding. After finishing your project, now it is the most difficult and time consuming part to think about your project deployment. You don't need to get the panic. aws will take all the responsibility of you project's server deployment, security, elasticity, scalability, administration, watching logs, trails and much more. Even-though you can use aws as your working environment i.e os, git, container, editor, ide everything that you needed but the access management and control are your responsibility, aws is not responsible for the access control and management.
Requirements:
1. create an account on aws
2. login into your aws account
Procedures to create ec2 instances:
Step1: click on services that is top-left corner of your portal, you can see all services of aws.
Step2: You will get ec2 dashboard. Click on 'launch instances' button to launch and configure of your instances.
Step3: there are lot of Amis like linux, windows and ubuntu. Here, we selected ubuntu 18.04 ami and we will complete total project deployment on ubuntu 18.04. So select ubuntu 18.04
Step4: Choosing instance type step. we will select t2.micro general purpose family. t2.micro (Variable ECUs, 1 vCPUs, 2.5 GHz, Intel Xeon Family, 1 GiB memory, EBS only). click on next button to configure instance details.
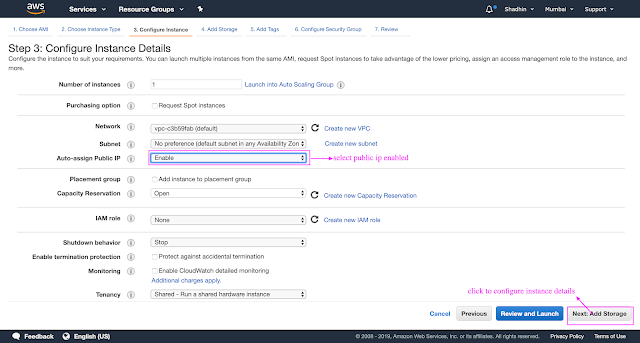
Step5: Configuring instance details. There is no need to configure all settings just enable auto-assign public ip. Next click to add storage.
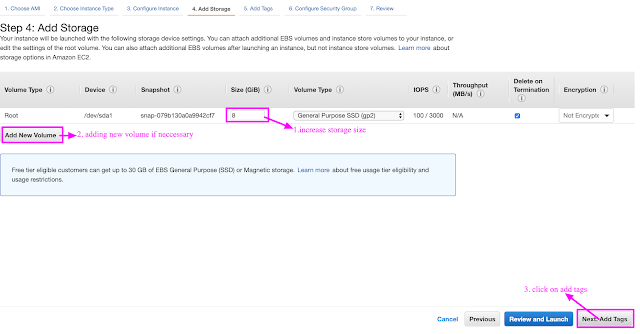
Step6: adding storage step, you can increase storage size or add new storage volume. Then click on next add tags button.

Step7: adding tags, if you want to add tags you can. Here we don't add any tags. Just click on add security group.
Step8: adding security groups, here creating a security groups which rule you accept or deny in your instance. click on review and launch
Step9: here arise a pop up window where you can generate a key-pair to access that instance. this is the most important part of instance creation. download the key-pair. Remember it where keep it.
Step10: you can see a message related to "instance is launching". click on view instance.
Step11: Now this is instance page. you will get all instances made by you. Select one of them, you can get instances description tab, status checks tab, monitoring tabs and tags tabs. You will get instance's public ip in description tab. copy it or you can get the ip when you want it. click on connect button to get accessing command from your instance.
Step12: Now you can get this pop up window. go to that directory where you download the key pair while creating the instance
Step14: if you are Mac or linux user, open up the terminal and go to the directory where the key-pair has been downloaded as 'cd ~/Downloads/'. and execute the following command.
Step14: if your instance was shut then you have to start it using this step
NB: if you are windows user you can use putty software to convert .pem file and access your ec2 instances. you can browse here https://aws.amazon.com/premiumsupport/knowledge-center/convert-pem-file-into-ppk/ .
Step4: Choosing instance type step. we will select t2.micro general purpose family. t2.micro (Variable ECUs, 1 vCPUs, 2.5 GHz, Intel Xeon Family, 1 GiB memory, EBS only). click on next button to configure instance details.
Step5: Configuring instance details. There is no need to configure all settings just enable auto-assign public ip. Next click to add storage.
Step6: adding storage step, you can increase storage size or add new storage volume. Then click on next add tags button.

Step7: adding tags, if you want to add tags you can. Here we don't add any tags. Just click on add security group.
Step8: adding security groups, here creating a security groups which rule you accept or deny in your instance. click on review and launch
Step9: here arise a pop up window where you can generate a key-pair to access that instance. this is the most important part of instance creation. download the key-pair. Remember it where keep it.
Step10: you can see a message related to "instance is launching". click on view instance.
Step11: Now this is instance page. you will get all instances made by you. Select one of them, you can get instances description tab, status checks tab, monitoring tabs and tags tabs. You will get instance's public ip in description tab. copy it or you can get the ip when you want it. click on connect button to get accessing command from your instance.
Step12: Now you can get this pop up window. go to that directory where you download the key pair while creating the instance
Step14: if you are Mac or linux user, open up the terminal and go to the directory where the key-pair has been downloaded as 'cd ~/Downloads/'. and execute the following command.
$chmod 400 "your-aws-key-pair-name.pem"
$ssh -i "lemp-stack-aws.pem" ubuntu@ec2-13-235-81-205.ap-south-1.compute.amazonaws.com
write 'yes' and press on 'enter' button. Now you are connected with your ec2 instances.Step14: if your instance was shut then you have to start it using this step
NB: if you are windows user you can use putty software to convert .pem file and access your ec2 instances. you can browse here https://aws.amazon.com/premiumsupport/knowledge-center/convert-pem-file-into-ppk/ .
what do you think, why am I using this letter? you will get the answer soon....


Comments
Post a Comment