PHP7.3 installation on aws ec2 instance ami ubuntu 18.04
Introduction:
No need any kind of introduction about php. php7.3 version has been released on 6th December 2018. This is the latest version of php. We will install php7.3 on our ec2 instance whose os is ubuntu 18.04.
Requirements:
Step9: edit /etc/nginx/sites-available/default file with the command and code as below.
Special Notification (SN): note that is fastcgi_pass php7.3 or not. if not then make it 7.3 or the version you want to utilize.
$ sudo nano /etc/nginx/sites-available/default
Step11: now execute the following command to save nginx configuration file
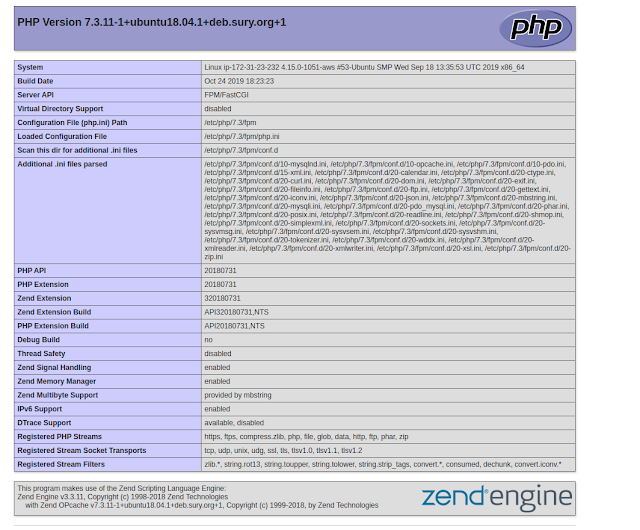
Now open your browser write your instances public ip address 127.0.0.0(your ec2 instance's public ip address)/info.php and press enter. You will see this page.
Now php7.3 with nginx has been boomed...................................................
No need any kind of introduction about php. php7.3 version has been released on 6th December 2018. This is the latest version of php. We will install php7.3 on our ec2 instance whose os is ubuntu 18.04.
Requirements:
1. aws account access2. running ec2 instance3. accessing the ec2 instance, if can't access please visit blogspot or medium4. nginx installation, if not installed please visit blogspot or medium
Step1: open your terminal and run the command:
$ sudo apt updateStep2: Installation python software properties, software properties common and adding ondrej ppa with required packages. while installing software properties press 'ok' two times and while installing ondrej then click on enter button
$ sudo apt upgrade
$ sudo apt install software-properties-commonStep3: Installation php 7.3 on ubuntu 18.04
$ sudo apt-add-repository ppa:ondrej/php
$ sudo apt update
$ sudo apt-cache search php7.3Step4: See the php version by the command
$ sudo apt install php7.3 php7.3-cli php7.3-common php7.3-opcache php7.3-curl php7.3-mbstring php7.3-mysql php7.3-xml php7.3-zip php7.3-fpm
$ php -vStep5: If you want to configure your php then you can get your php.ini file within
/etc/php/7.3/cli/php.iniStep6: If you want to see all your php configuration settings
$ sudo nano /var/www/html/info.phpStep7: Now paste the following code
<?phpStep8: press 'cltr + x' and press 'shift + Y', then 'enter' button to save the info.php file.
phpinfo();
?>
Step9: edit /etc/nginx/sites-available/default file with the command and code as below.
Special Notification (SN): note that is fastcgi_pass php7.3 or not. if not then make it 7.3 or the version you want to utilize.
$ sudo nano /etc/nginx/sites-available/default
Step10: press 'cltr + x' and press 'shift + Y', then 'enter' button to save the info.php file.server {
listen 80 default_server;
listen [::]:80 default_server;
# SSL configuration
#
# listen 443 ssl default_server;
# listen [::]:443 ssl default_server;
#
# Note: You should disable gzip for SSL traffic.
# See: https://bugs.debian.org/773332
#
# Read up on ssl_ciphers to ensure a secure configuration.
# See: https://bugs.debian.org/765782
#
# Self signed certs generated by the ssl-cert package
# Don't use them in a production server!
#
# include snippets/snakeoil.conf;
root /var/www/html;
# Add index.php to the list if you are using PHP
index index.php index.html index.htm index.nginx-debian.html;
server_name _;
location / {try_files $uri $uri/ =404;
}
location ~ \.php$ {
include snippets/fastcgi-php.conf;
# With php-fpm (or other unix sockets):
fastcgi_pass unix:/var/run/php/php7.3-fpm.sock;
# With php-cgi (or other tcp sockets):
#fastcgi_pass 127.0.0.1:9000;
}
location ~ /\.ht {
deny all;
}
}
Step11: now execute the following command to save nginx configuration file
$ sudo nginx -t
$ sudo systemctl reload nginx
Now open your browser write your instances public ip address 127.0.0.0(your ec2 instance's public ip address)/info.php and press enter. You will see this page.
what do you think, why am I using this letter? you will get the answer soon.
Now php7.3 with nginx has been boomed...................................................


Comments
Post a Comment